30 October, 2009

Whistler Race Cancelled..... Again.


Whistler has been putting on a fantastic ski mountaineering race (The Spearhead Passage) and National Championships for the past few years, excluding last year, as a result of no sponsors stepping up to the plate.  North Face and ROI the original sponsors of the event, did not have enough money to help fund the race last year, and as a result the North American Championships did not happen.  Unfortunately, this remains a problem, and the Spearhead Passage is still on hold.

The Continental Championships was an important race to have here in North America.  Last year, when the Whistler race was canceled, the International Olympic Committee (IOC) lost its bid for Skimo racing to become an Olympic sport.  “Part of the criteria for the IOC to accept a sport as an event is there has to be well-established regional and national competitions,” explain Jayson Faulkner, Canada's Coordinator for Ski Mountaineering Development.  So for now, we are yet another year behind in a Olympic Bid, due to no Continental Championship race.  Luckily enough, Ian Gale and Kicking Horse Mountain, took the sharp end and provided a savage race, the Dogtooth Dash as Canada's National Championships.


The major hurtle in funding this race is due to it's backcountry travel. The insurance, volunteers and planning is a heavy weight to lift.  Alternatives were explored, such as a shorter course on Blackcomb making the overall race much more technical and steep, but possibly more inexpensive.  The funding sourced still did not cover these costs, and Whistler Blackcomb did not want to take on more responsibilities with the Olympics this year.

Another year, of planning and even finding some sponsors, The Spearhead Passage is still without a major corporate sponsor and unable to put on this fantastic race.  The 26km race, holding 2130m (7000ft) of elevation gain, the only true backcountry event, and Canada's longest skimo race will happen, but not this year.  Not only is there a short course, as an alternative option to the long course, but also a vertical race the day after.  In a place like Whistler, that hosts the Olympics, holds multiple World Cups, and sees more visitors than many other resorts in the Country it is surprising Whistler Blackcomb and other sponsors aren't sweeping in to rescue this race.

With the Canadian Coast in need of a race, The Escape Route, are trying to put on a weekly or bi-montly series to fill the void.  The race series will not award ISMF points, but are being designed as a series, and hopefully pave the way for future races and events.  With more races that begin to pop up, the more publicity, and more support ski mountaineering races will recieve.

27 October, 2009

World Championships Are Near

The World Championships are nearly here. I've already started my countdown, I know the rest of the National Team has their tickets, and are training hard. Winter is going in some spots in Canada, but not everywhere, some people are skiing, and some are not. I've even heard some reports of good ice climbings so far.

If you are unfamiliar with the Ski Mountaineering World Championships, this year they are located in Pyrenees Mountains in Andorra, and hosted by Gran Valira resort. The Teams race will be in Arcalis though.  The European Championships were hosted in Andorra in 2005, so racers can expect a fantastic and savage course, as years previous. (photo:  www.skimo.org)

Team Canada will be approx 12 people or so, thats all I can say for now, an official press release will be out soon. The Golden Skimo Team, also members of the Canadian Team have been givin 'er with their training, and are pumped as well.
To keep the stoke going strong, here are two movies from the Canillo 2010 website, from previous races in Andorra, and what to expect.


The Countdown is on....  124 days and counting.

26 October, 2009

Pre Season Race Tuning


The snow is falling, the air is cool, and the end of October or start of November is the time you should begin to prep your training skis, and race skis, for the upcoming season.  Starting to get your skis ready now will mean faster skis later.  That being said, I like my skis to be fast, but I don't wax and tune them the same way I would a downhill race ski.  Going to fast with tiny skis through rough terrain may cause a fall, and thus time lost during the race.  My goal is to glide as quickly as possible on the flats, rather than looking for speed in couloirs or descents where I am trying to keep my speed in check, which will allow more time to recover from less skating.

To start you need a stone grind.  A stone grind is vital to making sure you have a great all around base structure, that will help clear the water underneath your skis (you ski on water not snow technically), and help guard against any suction on the base.  An all around structure is perfect for being on the road, when your unsure of upcoming race conditions.  A coarse structure is better suited to wet conditions, whereas in colder conditions you should be able to see the structure but not feel it with your fingers (fine), an all around structure is right in between.  If you would like to choose a specific structure for time of season, or known snow/weather conditions do so, just don't be wrong.  Grinding the base will also renew the skis base, flatten the ski, and allow the base to accept wax much better.  Make sure that you are not getting a belt grind, as it will not flatten your base properly!  We can talk base structure all day, but for Rando racing, it is not as important as downhill racing.  When it comes to stone grinding machines, I prefer Montana, opposed to Wintersteiger machines.

After your base grind, the shop will probably put a base bevel on your skis, usually around 0.5 degrees.  It's time to sharpen your skis.  I recommend a 2 degree side edge bevel.  The reason why 2 degrees is the angle of choice, is because it is the best balance between strength and sharpness.  Anything more/less will result in more strength but less edge hold or vise versa.  Always sharpen before you wax, as to not push any metal shavings into the base, and into your new wax job, polluting your base.  De-tuning the tips and tails slightly will help your skis from catching an edge, and will allow you to throw them around with ease, and less chance of them catching.
Now after all this, comes the waxing.  Waxing is one thing we all concentrate on, but without a good base grind and structure, you can negate its benefits causing more suction and a sticky base feel.  Your first wax should be with a generic softer wax, with no added fluorocarbons.  Waxing for the first time with a Fluorocarbon wax will actually damage you base on a microscopic level, and slow you down.  Start with Mr Miyagi's wax on wax off.  Wax one thin coat of your generic wax onto the ski, and scrape it off before it cools, this will help clean your base and "de-fang" the structure.  If you consider yourself really hardcore in your tuning, you can do this around 5 or 6 more times, to make sure your base is really well setup.  When scraping, make sure to scrape tip to tail with even pressure, in one direction and pushing the used wax off the ski as to not push it into the base.

After each wax and scrape, you must make sure to brush your skis.  I recommend using a medium to stiff horsehair brush.  Nylon brushes will electronically charge your base, slowing you down on those dreaded flats, so horsehair is your brush of choice.  Brushing helps clean out the structure, that you paid so well to have laid down on your base, and prep the base for yet another coat of wax.  Wipe the ski with a fibertex pad under a brush or scraper (distributes the pressure evenly), approx 50 times, to take off any micro hairs left over. 

Now here's where things differ from Rando racing to Downhill racing.  I recommend using a low to medium Fluorocarbon wax, starting your waxing with a low Fluoro and moving to medium Fluoro, such as Swix F4, after the initial first few waxes.  Each time you wax, make sure the iron is just below it's smoking point so you won't destroy the Fluorocarbon content of the wax (which happens when improperly heated), and continue running the iron over the skis (front to back)

for a few minutes.  Make sure to let the skis cool for at least 20 minutes.  You can also begin using a hotbox for this process if you are lucky enough to have access to one.  This will help open up the pores of the ski and accept more wax. If you live in a colder climate (e.g. Rockies vs Coast Range), start with softer warmer waxes then move to harder colder waxes.  Cold wax is their to protect your base from burning which will create micro hairs and slow you down, and is why your bases are white and furry after a cold day.

Now that you've put on your dozen coats of wax or so, it's time to ski them.  This is important, ski your skis before putting skins on them!  I recommend doing this as there will be a small amount of residue wax and putting your skins on early will pollute the glue on a race set of skins.  Your skis are now ready to go, and this is why you may not want to go spend all your paycheck on race wax, as you will ski some of it off.  I'll usually ski one top to bottom run on my race skis here in Whistler, then retire them for the first race.

This method has seemed to work really well for me, and benefit my "system" of skins and skis the best.  Every time I didn't take a run without skiing my skis first, my skins would come off too easily, and I would be worrying for the rest of the race when the problem would correct itself.  With each successive tune throughout the season, the skis will get faster and faster, giving you a better chance to win.
23 October, 2009

A Shift In 24 Hour Races


Long challenging endurance events are very needed here in North America. With the possible loss of the "24 Hours of Sunlight," becoming a 12 hour event rather than the full 24 hours, North America is starting to fall off the map for vertical racing.  The 24 Hours of Sunlight, in Glenwood Springs Colorado, has always been covered by big blog names like Lou Dawson (Wildsnow), Andrew McLean (Straightchuter), among others.  A race just to participate in and test how much vertical you can push out is fantastic. 


24 Hours events such as the Gastein 24 Hour Race in Austria proves how important these races are in pushing the ski touring communities limits.  Last year, both the men's and women's world records for most vertical ski toured in a 24 hour period was broken.  Ekkehard Dorschlag pumped out 18,288m (60,350ft), and Anne Marie Gross 12,700m (41,910ft), blowing the Eric Sullivans 24 Hours of Sunlight and World record out of the water which was 15,565m (51,068ft). 

With a 12 hour race in place of a 24 hour race, how is North America expected to keep up with the Europeans?  We need either the Sunlight Race to stay a true 24 hours, and for other resorts or race organizors to step up to the plate, keeping North America on the map for hard long endurance events.  Racing is important and races like these are great showcases for the sport, and without them the sport will have less publicity, and advance at a slower rate.

18 October, 2009

External Weight - Lighten Your Load


Weight is a BIG issue in ski mountaineering racing, as well as speed traverses, or light and fast missions.  Every gram counts.  For the past few years people have laughed at the idea of cutting your toothbrush in half, and drilling holes in it, for longer traverses.  Or maybe weighing base layers and socks on a gram scale to decide what to wear.  But the difference between going light, and not, is easily noticeable when you look at the speed at which you can move over vast amounts of terrain.
Photo Right:  Ty Petrusic & Matt Francis Packing For An Expedition (HEAVY)

Let's start with your feet.  This is the most important spot to shave weight.  If you you take 1 pound of weight off your feet, it is equivalent to taking 5 pounds off your back, which is easily a quarter of the weight of a heavier day pack.  This extra strain works the core muscles into fatigue faster, and impedes their ability to properly support all your limbs, slowing you down and making you tired.  Now since you are zig zagging up a mountain, rather than hammering straight up, you take approximately 6 strides to gain around 1 meter of elevation gain.  If you are wearing a nice light pair of boots, say approx 1 kilo, that equipment is being moved  6000 times per 1000m of elevation gain.  That's 6 tons of weight your body is moving on the ascent.  See where I am going with this?  Light skis, bindings, boots, and skins although expensive, are worth the investment. 

Stano Faban's analysis on vertical speed seen here, we can see that because uphill runners have less weight on their feet, as a result their overall vertical speed is faster.  There are quite a few other contributing factors to this, such as skin track angle, snow conditions, stride frequency/cadence, and sole stiffness, etc.  The overall effect is the lighter you are, the better.

So what about our arms?  Skimo racing, training, and touring is a quadrupedal sport, meaning we use all four limbs to propel ourselves forward.  So training our arms, as well as shaving weight off what we're carrying, will help free up more power for other parts of the body that may need it.  Skiing uphill, poling helps us not only move forward but extend our stride length as well, a serious benefit to building speed.  Poling with our arms, is not simply using just our arms, but extends our muscular power into the upper body (Latissmus Dorsi, Triceps Brachii,etc).  So reducing the weight to save strain on these muscles is incredibly important to keeping our stride long and our shoulders from hurting during the recovery phase.  As your arms tire, they rely on the core to support them, which strains the entire endurance system.  Racing or speed traverses take a huge amount of energy and squeezing every last drop of power is important.

Most race poles weigh around 130 grams.  Moving these sticks up and down over a 1000m climb is approx 390 kilos, estimating we move each side 3 times per 1 meter of elevation gain.  How heavy are your poles?

Packs are another issue, and one which we concentrate a lot of our gram shaving on, due to the diverse amount of gear we bring with us.  A recent study found packs that weighed 5.4kg caused an increase of oxygen uptake of 620ml/min (1.5% VO²Max).  With an increased load of 10.4kg, the oxygen uptake level was increased to 740ml/min (4.8% VO²Max).  Oxygen uptake in ski mountaineering racing is incredibly important, limiting the bodies ability to draw oxygen at its optimal rate, reduces speed and causes the racer to reach their lactic threshold faster.  This study also showed that heart rate was significantly reduced while even just standing.  With any load, the heart rate jumped up 9 beats per min, and slowly increased with added weight.  Adding injury to insult, the Trapezius muscle saw an increase in the force the backpack had on it, seeing an increase in the percentage of Maximal Voluntary Contraction (MVC) as loads became heavier.
Photo Above:  Jeff Van Driel hauling a heavy pack on the Garibaldi Park Traverse.

In the scientific sports testing community it is thought that static muscle contractions should be around 5% MVC to avoid fatigue after 1 hour.  Simply standing with a load, would allow an athlete to maintain that 5% MVC, however, moving with loads quickly adds more force to the body and surpasses the 5% MVC limit desired. 

The chart to the left, describes the metabolic limit each sex and age limit has on carrying weight before affecting endurance.  Please not that it includes, pack, clothing, gear, boots, etc.  Note:  study based on 60-70kg weight range.

The goal is simply to go as light as possible in the end, without forgoing any safety or rescue equipment.  The more weight you shave, the longer, the faster you can go as a direct result of better oxygen uptake, increased endurance, and better recovery.  Weigh everything, compromise nothing, train for more weight than you expect to carry.

Rainy Season Training - Buck Up Winters Around The Corner


Rainy season is here.  Cold, wet, and dark.  To most people this is a pretty dull time of year, most of time spent inside, safe and sound from the weather.  It is also an important time to stay motivated and keep training.  Winter is just around the corner!  Snow has already hit the ground, and things are getting real, as can be seen here in Whistler.

December 5th is the first race of the Canadian Skimo Circuit, and it's a double race, The Tiki Torch Dash.   First race is a Team Relay (500 ft), then a vertical race (approx 1500 ft), both will be lung busting for sure.  I can already envision anaerobic sprinting to a near puking finish!  Never the less, using this time wisely is important, even though it's pissing rain 24/7.  Lots of vertical is important to begin trying to be as sport specific as possible.

The summer's base training period, which is still in effect, was fairly easy (as it should be).  Lots of aerobic work, even at work guiding clients up and down mountains, climbing, and being up higher.  Work would be around 6-8 hours of constant LSD (Long Slow Distance) work, almost all of it uphill with a guides pack.  After work, would be time to workout at a specific HR (usually 150-160bpm to build VO2 Max as optimally as possible) most of it running.  A few longer days in the mountains alpine climbing and hammering around were great to keep the stoke up too!


I am still running, keeping a large portion of the training aerobic, as to not start being too intense with my training too soon.  I've been trail running around 13 miles (or more) on my running days, usually 3 times a week, as it does strain my knee.  Most of the runs, I've been trying to incorporate really large hills, or running purely uphill to mimic skimo racing as best as possible.  Now that it is dark and rainy, trail running has become a bit more challenging, especially on steep descents.

With the base training period nearly over, I am looking forward to starting to hammer, and do some great intervals!  Everyones training for the winter, are you?

13 October, 2009

Rando Race Boots & Stride Dynamics

Recently there has been a lot of heated discussion on the dynamics of boots and their relationship between sole flex and better stride.  So let’s get down into the two separate theories behind both ideas behind a bellowed boot, the Scarpa F1, and the Pierre Gignoux XP444, a solid non-flexible sole. 

Bellowed Boots

A boot that has bellows on it, like the Scarpa F1, is designed to flex at the metatarsals of the foot giving the Rando Racer the most natural stride as possible.  When you are skinning, after the foot lands and is drawn behind the body (this motion is known as “Dorsiflexion,” the toes are brought closer to the shin, and the foot is angled with the shin approximately 20º-30º) and then goes into it’s “Plantarflexion,” stage.  During the last portion of Dorsiflexion, the toes bend at the Metatarsals and the foot Plantar Flexes, which is where the foot gets its maximal stride power. 


So how is this techno jargon related to Rando Stride?  Well, allowing the foot to flex as naturally as possible, its thought that the boot will not restrict the natural movement of the foot.  This way the tendons and muscles of the foot can perform unheeded.  With this idea, while the foot pushes off the ground, it allows for an added “kick” to the stride. 

The downside to this boot design is that it is intended for a rolling low angle course design.  As long as the boot is on this style of terrain it can be an excellent choice.  On a course that is steeper, the flex of the bellows actually is an disadvantage, as it does create some energy loss in the boot which causes more muscular strain on the foot.  This muscular strain may tip the lactic acid scales over into the red zone if the racer does not pay attention to what they are doing.

Fitting this boot, should you choose, the foot and boot must allow at least 0.5º or greater, of pronation to get the most natural effect of the boot. 

Stiff Soled Boots 

A stiff soled boots, such as the Pierre Gignoux XP444, Spanish Ara Components boot, or La Sportiva, is its designed to support the foot in a more neutral position.  Much like the description of foot in the past section, it follows the same combinations of movement, but without the toes flexing at the Metatarsals.  It is thought that there is no energy loss, due to the stiff sole, and lack of Metatarsals flexing. 

This boot takes advantage of this of the lack of energy loss, and is why it caters to steeper courses, rather than low angle and rolling courses.  The disadvantage with the boot is that it does not allow for that extra “kick,” on the low angle rolling courses. 

Fitting this boot, the foot and boot are should allow the foot to be at approximately 0.5º of pronation without going over, to take advantage of the foot’s power during the Plantarflexion phase of the Rando Stride. 


Two Schools Of Thought… Or Three?

We can never know for sure which boot is truly the fastest, with the most amount of energy transfer or loss, but certain ideas are close.  The Dynafit Dy.N.A boot allows for 5mm of flex, where the bellows would be on an F1, without the bellows.  The boot is cut away so that the boot can flex, but a carbon limiter is installed to keep that within the 5mm limit, combining the large flex of the F1 and the zero flex of the Pierre Gignoux.

Conclusions?
So a real conclusion, other than inconclusive?  The largest asset that a boot can have is a non-limiting lower shell.  Meaning that when the foot is striding forward (Plantarflexion), elongating, and gaining as much forward distance as possible, it must not be limited by the lower shell.  The higher the internal cuff, the more chance that calf will "bottom out," and limit the stride length.  Boots with stiff backed liners may also have the same problems as boots with high internal lower shells.  By getting the boot with the least limitation to the foot, the racer will see the largest gains, the slightest energy transfer gains or losses are barely an issue.  Find the boot that works best with your foot, and have it fit correctly, to get the best results.

11 October, 2009

The North Face of Fitzsimmons - A Spearhead Classic

The Spearhead Range has a large amount of beautiful steeps descents.  What draws most people to the Spearhead is its easy accessibility, taking the lifts up to the alpine to start touring, and everything can be done as a day trip (if your fit enough).  It's crowning jewel is the North Face of Fitzsimmons.  A beautiful 380m wide open face of 45º-50º steep skiing.  It saw its first descent in 1992 by Eric Pehota and Trevor Petersen.


The conditions to ski this aesthetic line come in only a few times a year, and the face sees some massive avalanches which often fail down to the glacial ice below it, so one must be patient to ski it.  It's angle, various trigger points, exposure, and commitment levels are something to consider when deciding to ski this face.  The other problem that ski mountaineers can come across is the monstrous bergschrund that must be negotiated at the top before dropping into it.  After skiing to the bottom the descent is not yet over, as you will be dodging crevasses even out in the flats.
Note:  this 2009/2010 season, we lost a lot of snow in the summer, and our snow bridges must be fully rebuilt, which will take more time than usual.  

The best way to access this line is by skinning over the Musical Bumps (Fitzsimmons Range off the backside of Whistler) to the Fissile/Whirlwind Col.  From their move quickly onto the shoulder of Overlord and to the Fitzsimmons/Benvolio Col.  You can drop down only 100 feet or so down Bonk Hill before hooking left to the obvious Fitzsimmons bootpack, a wide and short chute.  This short bootpack will bring you to the top of it's glacier, providing beautiful views, and where your difficulty may begin with negotiating the Bergschrunds.  Stay fairly high, traversing to your right to hook into the top of the face (where the red line begins in the photo above), where you can now drop in.


Finding your way back is fairly easy.  You can just follow the creek down to Adit Creek and begin skinning up the moraine up to the base of the Overlord Glacier and following the natural ridge lines back to Russet Lake and out Singing Pass.  Or, you can climb back out of the Alp like basin by skinning and bootpacking up the Overlord and back across the Refuse Pinnacle the way you came in.

The trip is about a 36 km round trip including the long descent on Singing Pass,  and is around 1600-1700m of elevation gain.  You can find a great trip report on my friend Lee's Site here.  I fully recommend this trip to any person well versed in steep exposed skiing, crevasse rescue, and a handful of gels.

07 October, 2009

First McBride In A Day - Video Online For Real!!

After much playing around, Craig has managed to hook this great video up of our First McBride Traverse in a day.  

Enjoy!

06 October, 2009

Eating For Racing or Big Days


    Ever had a massive bonk on your tour, or even during a race? Most of the time, that bonk comes from what you have had to eat, and the other percentile is when you’ve out stepped your limits. So what should we eat before, during, and after to make the most of the day? It boils down to how much, and the quality, and kinds of food you want to eat.
    I began researching performance eating a few years ago, after having a few eye opening bonks, and trying to push my touring experience. I found it to be one of the most interesting things to learn about, and now know how complex it can be, especially when coming to understanding blood sugar, insulin response, and gastric emptying. But when it comes down to it, its fairly simple, eat simple foods, don’t over indulge, try to stay away from sugar and greasy foods, and hydrate.

Before Going Out

  • Breakfast
    Breakfast is really important when putting a big day in, however, when racing one must be incredibly careful with the timing. When you are racing, ensure you have 3 hours to digest before racing, as the gastric emptying of your stomach (1 liter per hour) will not be fast enough if you eat to soon to the race. The idea with breakfast is to top of liver glycogen stores. For a big ski tour, I like a big bowl of oatmeal, with ground flax, rice milk, cinnamon, hemp seeds or pecans. The oatmeal is a complex carbohydrate giving me energy, as well as the rice milk, the ground flax is a good quality fat, and the hemp seeds or pecans are a protein, which will help stabilize my blood sugar levels. The idea is that this breakfast will give me a slow release of glucose into my blood stream throughout the morning. Having a sugary breakfast like a muffin, maple syrup, or whatever can cause a spike in glucose levels as it is released rapidly, and causes a strong insulin response. This will cause you to bonk later in the day.
  • 15 minutes before exercise:
    • 300-500ml of water (not Gatorade or electrolyte drink),
    • 100 calories of easily digestible fuel (the same fuel you plan on using during the day).
During The Day/Race
  • Liquid intake rate should be 150-250ml (5-8oz) every 15 minutes.
    • There is 5% decrease in performance for every lb lost during exercise. The down side of drinking water, we are limited. Drinking too much can cause hyponatremia (over hydration) and stomach bloating/cramping. Drink water but not too much.

  • 100-300 calories per hour.
    • 260-280 calories per hour is optimal. By ingesting small amounts, under 300 calories, it allows the body to continue using the most energy on the task at hand (skiing) and not diverting energy to digesting your food. Taking in more than 300 calories can also cause stomach upset, every notice after a long big lunch out that you are sluggish and can’t push the pace?
    The food should be very easily digestible, and when I say easy, I mean really easy. Foods that are easily assimilated into the stomachs walls are incredibly important; otherwise you may be burning more calories to digest it than what it gives. Foods with lots of sugars in them, raise your blood sugar levels too high causing a strong insulin response, and affect the osmality of the stomachs walls (thus not taking in the food you have given your body as easily, and creating bloating and/or cramping).
    So what to eat? Liquid diet foods such as gels, chews, sports drinks, and foods like dates, are easily digestible, and will allow glucose levels in the blood to be more stabilized. Eating solid food is important for long endurance efforts, such as big days, training, and speed traverses. Eating some solid food is important for the body, and mind, and gives the body other forms of food rather than just carbohydrate. Ingesting good quality fats and proteins are important. Fat burns as an energy incredibly well, keeps you warm, and will make sure you go long. Fat is your primary endurance fuel, so take in good quality fats, bad fats won’t help. So put down that greasy bacon breakfast, it’s not helping. Protein helps rebuild muscle tissue and can have important amino acids in it. I recommend a ziplock bag of almonds to munch on during the day. The protein and amino acids in them will help prevent muscle cannibalization, and help aid a faster recovery.

After Your Done
Within 45 minutes of finishing
  • Drink: 600-720ml of water for each pound lost
  • Eat: approx 60g of high quality carbohydrate, and 10-15g protein, with a small amount of good quality fat.
    • This stage is essential for a good recovery, and be able to get out the next day, even if your just taking it easy. Eating these amounts right away, as a snack, will help rebuild your glycogen stores you’ve depleted over the day, and begin repairing your muscles. A good dinner an hour later or so, after you’ve gotten home and relaxed, will help continue that process.

03 October, 2009

Dynafit Dy.N.A Boot - Get Stoked


    The much anticipated Dynafit Dy.N.A World Cup Race boot is here, and is building a strong following already.  The design pulls from many great designs, taking the advantages of all the race boots on the market (and off), and combining it into one.  As a racer I try to constantly find even the smallest advantage over the competition.  Looking into many different schools of thoughts on race boots, I found that the Dy.N.A combined all of them in their own way.

    Carbon, the beautiful sleek lightweight, makes the boot stiff and burlier than you would think.  Even without a tongue to add extra stiffness, this boot is surprisingly stiff, unlike many other uber light gear out there.  Combined with its build, it is designed for performance.

First of all let’s talk about the massive rearward cuff rotation.  It allows 62º of plantar flexion of the foot in the boot, allowing you to extend your stride way out in front.  This adds tens of centimeters of length to your stride.  So what does this longer stride mean?  Well, if you were to simply have 5cm longer of a stride, over 1000m of elevation gain, this would equate to an additional 300m of elevation gain.  More than this will put you light years ahead of the competition.
    The cuff itself is actually two separate pieces, with two hinges, giving the boot the unrestricted rearward   cuff rotation.  Most other boots on the market are built with a slightly higher lower boot, which extends into upper cuff, and can reduce your stride length. 

    The Dy.N.A boots build takes in two schools of thought.  The first is that a fully rigid sole with no flex is best suited for steep courses, but does not have as natural a stride on long flat stretches.  The second is that a flexible boot, with bellows like the Scarpa F1, the boot has a beautiful stride on long more flat or rolling courses, but does have some energy loss on steep sections.  Dynafit combines these ideas as one, and allows the Dy.N.A’s sole to flex only 5mm, giving it a stiff sole for steep ascents, but a more natural stride on flat courses.  The advantage to ultra long distance, for example speed traverses, or 12+ hour days, is there is less chance of blistering under the toes and ball of the foot, as a result of excessive motion in the foot from bellows that allow a large amount of flex of the boot sole. 
    Next comes the Ultra-Lock buckle lock system.  This system, much like the Scarpa F1, Pierre Gignoux, and La Sportiva boots, allow the user to undo the upper buckle on the cuff loosening the cuff and simultaneously switching the boot into walk mode.  The advantage that the Dynafit boot has over its competition, is there is less chance that you may accidentally break the cable holding the system together, by totally eliminating the cable.  The buckle clicks directly into the boots cuff, holding the boot in ski mode when tightened, and allows the cuff to move freely in walk mode when undone. 


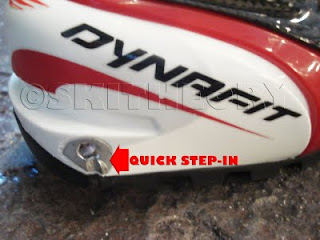
    Have you ever been at a race transition, nearly anaerobic, breathing heavily, and trying to hold your foot still while clicking into your bindings as fast and efficiently in one go?  That problem is easily fixed with Dynafit’s quick-step-in inserts.  It allows the Dynafit toe pins to slide into the inserts smoothly and with less chance of popping into the wrong spot.
    Weight, however, still remains king.  The boots Pebax/Carbon build, shaves the weight of the boot down to under 1 kilo, coming in at 920g in a 27.0.  Studies have shown that if an athlete takes a single pound off their feet, it equates to six and a half pounds off their back, allowing for less strain and allowing the body to concentrate its energy to what’s important. 
    So how does it fit?  Fantastic!  The boots anatomically correct fitting, is perfectly sculpted to the human foot.  The heel is slightly narrower, but not overdone, as to cause problems.  It keeps the heel snug and free from excessive motion.  The area around the metatarsals flares out, allowing the foot to spread out when plantar flexing (pushing off) and able to generate the most amount of power.  The toe box even makes sure not to put too much pressure on the big toe, which can cause hallux abduction, and bone spurs. 
    The liner is the lightest liner on the market.  Half the size of the regular Garmont G-Fit or F1 Liner, but has enough foam to ensure there is enough material to mold to the foot, without compromising comfort.  The liner itself is less stiff than many others on the market and allows the foot and leg to move freely without fighting the liner. 
    Only a few rolling into North America this year, so get your hands on the Dynafit Dy.N.A World Cup Race boot, as soon as you can it rocks! 

02 October, 2009

First McBride Traverse In A Day

            Last year the goal we had in mind was to complete the Mcbride Traverse in a single day.  If you haven’t heard of the Mcbride it is one of the true Coast Range classics.  The 70km traverse begins on Blackcomb Mountain in Whistler, and ending at Rubble Creek at the base of Garibaldi Lake, boasts approximately 5000m of elevation gain.  Most parties complete the traverse in about 6-8 days, although some really fast parties may complete in 3-4 days.  It’s previous speed record was approximately 48 hours.
Map Courtesy of Google Maps
            We left at 1:00am on April 28th, from the Horstman Hut (a Blackcomb patrol hut), to get the first part of the traverse we knew quite well done by sunrise.  We had had a fantastic weather window that froze the upper snowpack, so travel was fast, but required ski crampons.  We kept the pace fast, trying to stay warm for the first section, and partly from excitement.  We arrived at the Naden Glacier, the descent into the first crux of the route, just as the sun began to warm the horizon.  Filling up the water bottles in the creek at the bottom, we downed as much water as possible, and continued on our way up to Mt Sir Richard, a long and big ascent.
Crux #1 Naden Pass to Sir Richard
 
View of the McBride Range from Mt Iago
            With the sun beating down on us now we were feeling pretty good at the top.  Topping out as high as our route would allow us on Mt Sir Richard, we bumped into some friends just waking up after spending the first night of 3 on the Mcbride.  They laughed at the size of our tiny day bags being so far out already. 
            Moving on towards the next crux (Drop Pass), we traversed and climbed through large gaping crevasse ridden glaciers, barely even having a chance to take in the beautiful views as we hammered by.  The day wore on, but by Drop Pass, we had run out of water and were ready for the first break of the day to brew up.  After 11 hours on the move, doing race transitions to keep the pace, stopping to air our feet out was great.  But no rest for the wicked as we had to keep moving as soon as our speedy Jetboil was finished its job and our water bottles were full again.
            Continuing on up our second crux of the trip, Drop Pass, we climbed our next monster climb, to regain our elevation we lost after a long ski down.  We skinned a ridgeline towards Hour Peak and its unbelievably gorgeous North Face.  I love this face, and skinning right by it was hard.  Being on the move for a long time now, we had pretty much found that solid food wasn’t going down as easily, and liquid food was the fuel of choice.

Hour Peak North Face & Route after Drop Pass
            Quickly finding ourselves at another crux of the route, Grey Pass, we descended through a series of massive benched convexities.  Picking our way through these benches, and crevasses, we were at our last uphill of the day.  Skinning up felt like we were done, but not yet!  Reaching the top, the massive expanse of Garibaldi Lake was in front of us.  We had lucked out with our timing, as the Lakes surface had frozen, and we were able to skate ski across to the head of the Rubble Creek Trail.
            Finding ourselves in darkness again, we put our skis on our back, and continued walking down the trail to the parking lot.  Just as we came into the parking lot, we were greeted by Lori, and Marcia with stew, water, cookies and fruit, we were pumped to be home. Video here.
Photo:  Craig McGee
First Mcbride Traverse In A Single Day
Time:  18: 21: 23
Left 2 Right:  Keith Reid, Alex Wigley, Craig McGee
Thank You To:  Dynafit, Blackcomb Patrol and Bernie, Lori, Marcia, Heidi, & The Escape Route